
Posted on 2016-Jan-10
Introduction
Print-on-Demand is a technology that has matured over the past decade and allows small presses and indie authors a financially viable option to publish print books. Publishing your print edition on CreateSpace is not a difficult process, but it can be confusing for the first-time publisher. CreateSpace is the leading print-on-demand provider for indie authors, and it is owned by Amazon. Print editions published through CreateSpace will show up as a product page on Amazon, and the print book will be distributed to other outlets via the Expanded Distribution option (which is now free). For an in-depth discussion of the pros/cons of CreateSpace vs. Lightning Source, please consult Aaron Shepard’s blog. In this tutorial we’ll do a step-by-step walkthrough of publishing your print edition on CreateSpace.
Prerequisites
To publish on CreateSpace, this tutorial assumes that you have:
- a CreateSpace account.
- a well-formatted PDF file of your book’s interior.
- a PDF file of your back cover, spine, and cover (more on print covers here).
- a blurb and five keywords.
Step-by-Step Walkthrough
- Log into your CreateSpace account
- Go to “Add New Title”
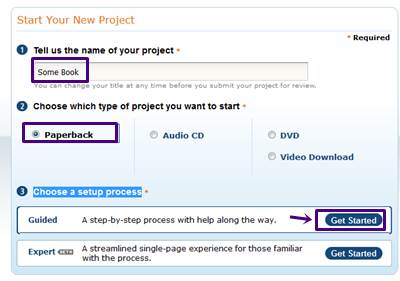
Start Your New Project: Fill out the fields as follows:
- Tell us the name of your project: Pick any name you prefer (note: this is just used as an internal reference in your dashboard and is not necessarily the title of your book)
- Choose which type of project you want to start: Pick “Paperback”
- Choose a setup process: Choose “Guided” by clicking on “Get Started”
Title Information
Title (required): Enter the title of your book under “Title” (BB eBooks recommends keeping this short < 5 words)
Subtitle (optional): If you have a subtitle, enter it in the “Subtitle” field. An example of a subtitle would be A Thorough Discussion for a book titled Manos The Hands of Fate, A Thorough Discussion.
Primary Author (required): Enter the author name. Do not use ALL CAPS.
Add Contributors (optional): Unlike KDP, you do not need to add the author name here. You add it in the “Primary Author” field above. You can add additional authors, illustrators, designers, and many other contributors if you like. Do not use ALL CAPS.
This book is part of a series (optional): If your book is part of a series, click on the check box for “This book is part of a series” and add the series name under “Series Title” and the series number in the “Volume” field. The volume should be a number only, like “1”, “2”, etc. rather than “Book 1”, “Book 2”, etc.
Edition number (optional): If this is a second or subsequent edition, you can enter “2” in the “Edition number” field. Be sure to enter numbers only, not “second”.
Language: Select the correct language from the drop-down menu.
Publication Date: BB eBooks recommends using the current date.
Click “Save & Continue”

ISBN
All print books must have an ISBN. This ISBN must be different from the eBook ISBN, if you chose to use an ISBN for your eBook edition. You have four options to secure an ISBN at CreateSpace. There are more details on ISBNs from CreateSpace here.
Option #1 CreateSpace-Assigned ISBN [Free]: CreateSpace can give you a free 13-digit ISBN. This allows distribution of your print book through all their expanded distribution channels, including libraries. The downside is it registers “CreateSpace Independent Publishing Platform” as the publisher in the ISBN system.
Option #2 Custom ISBN [$10]: CreateSpace can give you a 13-digit ISBN that allows you to list your imprint as the publisher (so BB eBooks Publishing as an example). The downside is you cannot distribute through all of CreateSpace’s distribution channels (notably it will not be distributed through libraries). Note: you can only use this ISBN at CreateSpace. If you are also publishing at Lightning Source or an off-set printer, consider Option #3 or #4 below.
Option #3 Custom Universal ISBN [$99]: CreateSpace can give you a 13-digit ISBN that allows you to list your imprint and use the same ISBN if you are printing at other places besides CreateSpace (e.g., Lightning Source, a local printer, etc.) The downside is you cannot distribute through all of CreateSpace’s distribution channels (notably it will not be distributed through libraries).
Option #4 Provide Your Own ISBN [Free]: If you would like to get an ISBN from the ISBN-issuing agency in your country and use this as the 13-digit ISBN, choose this option. The cost of ISBNs vary greatly from country-to-country. In Canada, for example, they are free, but in the USA they are $125! There are more details on getting ISBNs and the ISBN system on the BB eBooks blog.
Interior
Interior Type: Choose “Black & White” unless you have a color interior. BB eBooks only recommends color interiors for art/photography books and children’s books with illustrations. They are substantially more expensive to print, and the quality of the color interiors is not as good as Lightning Source’s.
Paper Color: Choose either “White” or “Cream”. White is considered best for genre-type novels and technical non-fiction, while Cream is considered best for literary-type fiction and non-narrative fiction. These are BB eBooks’ recommendations only, so do what’s right for your brand. Please note that regardless of the paper color, the interior PDF will always be white for your formatted interior.
Trim Size: Click on “Choose a Different Size” to pick your trim. The most popular trim sizes for paperbacks are 5x8”, 5.25x8”, 5.5x8.5”, and 6x9”. More on picking the right trim size for your book here.
Most people don’t know this, but you can select any trim size you like at CreateSpace. If you would like to do a custom size (e.g., 4x6.5”), then click on Choose a Different Size > More Sizes > Enter your own trim size, where you can specify any width and height you would like.
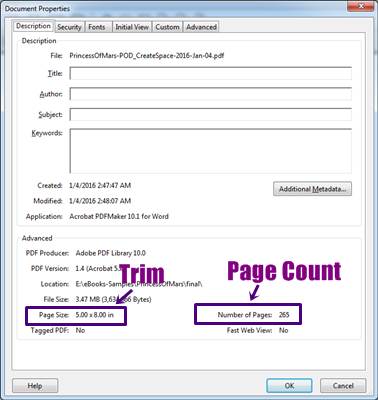
Tip: If you can’t remember what trim size or page count you have, open your interior PDF with Acrobat Reader and click on File > Properties > Description. The page size (a.k.a. the trim size) will be on the bottom-left of the display window, and page count will be on the bottom-right.
Click on “Upload your Book File” and browse your computer for the PDF interior.
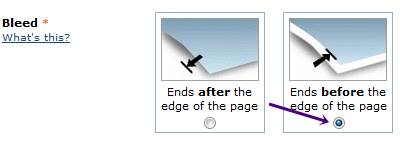
Bleed: Check “Ends before the edge of the page” unless you have a book where illustrations run to the very edge of the page like a magazine does. Please note: BB eBooks does not make full-bleed print interiors.
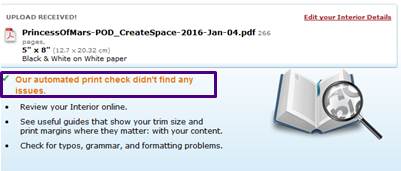
Interior Reviewer: Make sure to check the box to allow CreateSpace to run the automated print checks. This will also automatically load the interior reviewer once the upload and processing is complete.
Click on the “Save” button in the bottom right and the upload will commence followed by the CreateSpace print check. This can take about 5–10 minutes, so it’s a good time to grab a coffee, snack, smoke, or Yoga break, depending on your lifestyle preferences. Once it’s done, the interior previewer should pop up and CreateSpace will notify you with any issues. Clients of BB eBooks should never have any formatting issues—unless something broke with CreateSpace or we really messed up. If you’re not a client, please make sure to fix any formatting issues and redo the PDF interior. Otherwise, CreateSpace may not publish it.
On the interior previewer you’ll notice a dotted gray box around both pages. Don’t worry! The dotted boxes won’t actually show up in your print book. This box is the “safe zone” and all text elements should be inside it (unless you have a full-bleed interior). You’ll notice that the inner margins facing the book binding (a.k.a. the gutter margins) are bigger. This takes into account that there should be a bit more margin around the book’s binding because the paper will have some curvature to it. Running text deep into the binding creates a most unpleasant reading experience. You can click through the pages on the interior previewer if you like, but we generally recommend doing testing with Acrobat Reader in two-page mode because it is a bit faster.

Click on “Save and Continue” inside the interior previewer.
If all is well, you’ll get the message, “Our automated print check didn’t find any issues.” Your interior is done!
Cover
1. Select a finish for your book cover: You can either pick “Matte” or “Glossy.” BB eBooks recommends Matte for literary fiction and narrative non-fiction, and Glossy for technical non-fiction and genre fiction. The Matte finish looks a bit more serious and scholarly, but the Glossy is more contemporary and fun. Please pick whichever is right for your brand.
2. Choose how to submit the cover of your book: Check the “Upload a Print-Ready PDF Cover” radio button and browse on your computer to your prepared cover PDF. Please note that the prepared cover does not require the ISBN barcode and CreateSpace will add the ISBN barcode for you in the bottom right of the back cover. If you want to add the barcode to your cover beforehand, you can certainly do so. Bookwow has a neat tool where you can make an ISBN barcode. More on cover production here.
Click “Save” to upload your cover.
Once the processing is done (only takes a minute), you can click on “Continue” to proceed.
Distribute > Channels
Standard Distribution: It is recommended that you select all channels: Amazon.com, Amazon Europe, and the CreateSpace Store.
Expanded Distribution: This used to cost $25, but is now free. It is recommended you select all. Please note you may have to enter a BISAC code under “Distribution > Description” to allow you to check “Bookstores and Online Retailers.” Please feel free to come back.
Click on “Save & Continue”
Distribute > Pricing
Pick a price that will net you a decent royalty at all channels. The royalty deduction is based on the store sold from, the trim size, the page count, and whether your book is Black and White or Color. It is recommended you end the pricing in “.99”, as it is a common practice with book pricing. You can use the handy Royalty Calculator widget from CreateSpace to experiment with different royalty rates based on the book’s characteristics.
For the UK and European rates, it is recommended you base those prices on the US rate by clicking on the “Yes, suggest a price…” box.
Distribute > Description
Description: The “Description” is what shows up on your product page. This is very important so please make sure the blurb is as good as you can get it. You can alter this later on, but it will have to go through the approval process again. For advanced users, you can actually add HTML tags to include formatting elements like bold, italics, and underline. These are the same as the HTML tags supported by Amazon KDP. The supported tags are listed here. For example, if you wanted to render: The New York Times bestselling author Jane Doe is back with…, the HTML you would place in the description would be <p>The <em>New York Times</em> bestselling author <b>Jane Doe</b> is back with…</p>. Be sure to wrap every paragraph in opening and closing paragraph tags if you are doing an HTML description <p>…</p>. There is more discussion of HTML descriptions on Book Marketing Tools.
BISAC Category: Enter the Book Industry Standards and Communications (BISAC) code here. You only get to pick one (unlike KDP where you get to pick two).
Author Biography (optional): You can add a bio here if you like. For the Amazon page, we recommend using Amazon Author Central to set up your profile. However, filling in the author bio here is important, since your CreateSpace book will distribute outside of the Amazon ecosystem if you chose the Expanded Distribution channels.
Book Language (optional): Be sure to select the correct language from the dropdown menu.
Country of Publication (optional): Enter your country here from the dropdown menu.
Search Keywords (optional): This is important metadata. Be sure to pick five phrases (note: KDP allows seven) and you can separate with commas. Keywords can be a combination of words (e.g. erotic romance) and Amazon recommends 2-3 words long for each keyword.
Contains Adult Content: Check if your book is for 18+ readers only, otherwise leave blank.
Large Print: Large print books are typeset specifically for elderly and visually-impaired readers, so leave this box blank. The font size is typically 16pt or bigger and 6x9” trim. Because of these print characteristics, the Large Print edition will typically have a much higher page count. If you are interested in getting a Large Print edition of your book, please feel free to contact BB eBooks.
Publish on Kindle
Do not fill out anything in this section. CreateSpace will attempt to convert your PDF into a reflowable eBook—with horrendous results. eBooks should be published via Kindle Direct Publishing rather than CreateSpace. Please view our tutorial on how to publish your eBook at Amazon.
Complete Setup
Go to the “Complete Setup” portion on the left-hand menu. Double check that you uploaded all the correct files and metadata. Then click on “Submit Files for Review.”
It usually takes CreateSpace about 24 hours to review your book. They will notify you via email once they are done and instruct you if any changes are necessary (occasionally they may want to adjust the cover). They give you the option to order a proof via mail or approve a digital proof. Conduct your proofing either digitally or by mail and follow the instructions to approve the print edition. It will take about five days for the product page to show up on Amazon. If you published an eBook edition already, Amazon will automatically link the print edition to the digital product page. Congrats on publishing your print book!
Video
- [0:05] Introduction
- [0:20] Prerequisites (PDF Interior, PDF Cover, CreateSpace Account, metadata)
- [0:35] Adding a New Title
- [1:10] Adding Metadata for Your Book (Title, Sub-title, Author)
- [2:00] Series Naming
- [2:20] Edition Numbering
- [2:35] Language/Publisher/Publishing Date
- [3:00] ISBN and the four options
- [5:15] Interior Type: Black & White or Color
- [5:50] Paper Color
- [6:10] Trim Size
- [7:00] Custom Trim Size
- [7:40] Upload Your PDF Interior and Bleed
- [8:15] Automated Print Checks and Interior Reviewer
- [10:25] Uploading Your PDF Cover
- [12:10] Distribution Channels
- [12:55] Pricing
- [14:20] Adding a Description and BISAC Code
- [15:35] Adding Additional Information
- [17:20] Publish on Kindle (DO NOT USE!)
- [18:20] Complete Setup
- [18:35] Proofing Digitally or by Mail
Label: Self-Publishing
comments powered by Disqus